Your first form, explained
A little guidance.
Your first form is next.
Create a form people can fill in, then choose whether their responses should become Trello cards. Follow along with our sample Project request.
Publish makes your form available to respondents. Map to Trello enables automatic card creation. You can collect native-form responses without creating cards.
Step 01
Open Forms Flow+ and create a form
- Open the Trello board where you want to manage requests.
- If Forms Flow+ is not installed, open the board’s Power-Ups menu and add it. You may need a board administrator’s help.
- Click the board’s Forms button to open the Power-Up.
- Click + New form. You’ll enter the form builder.
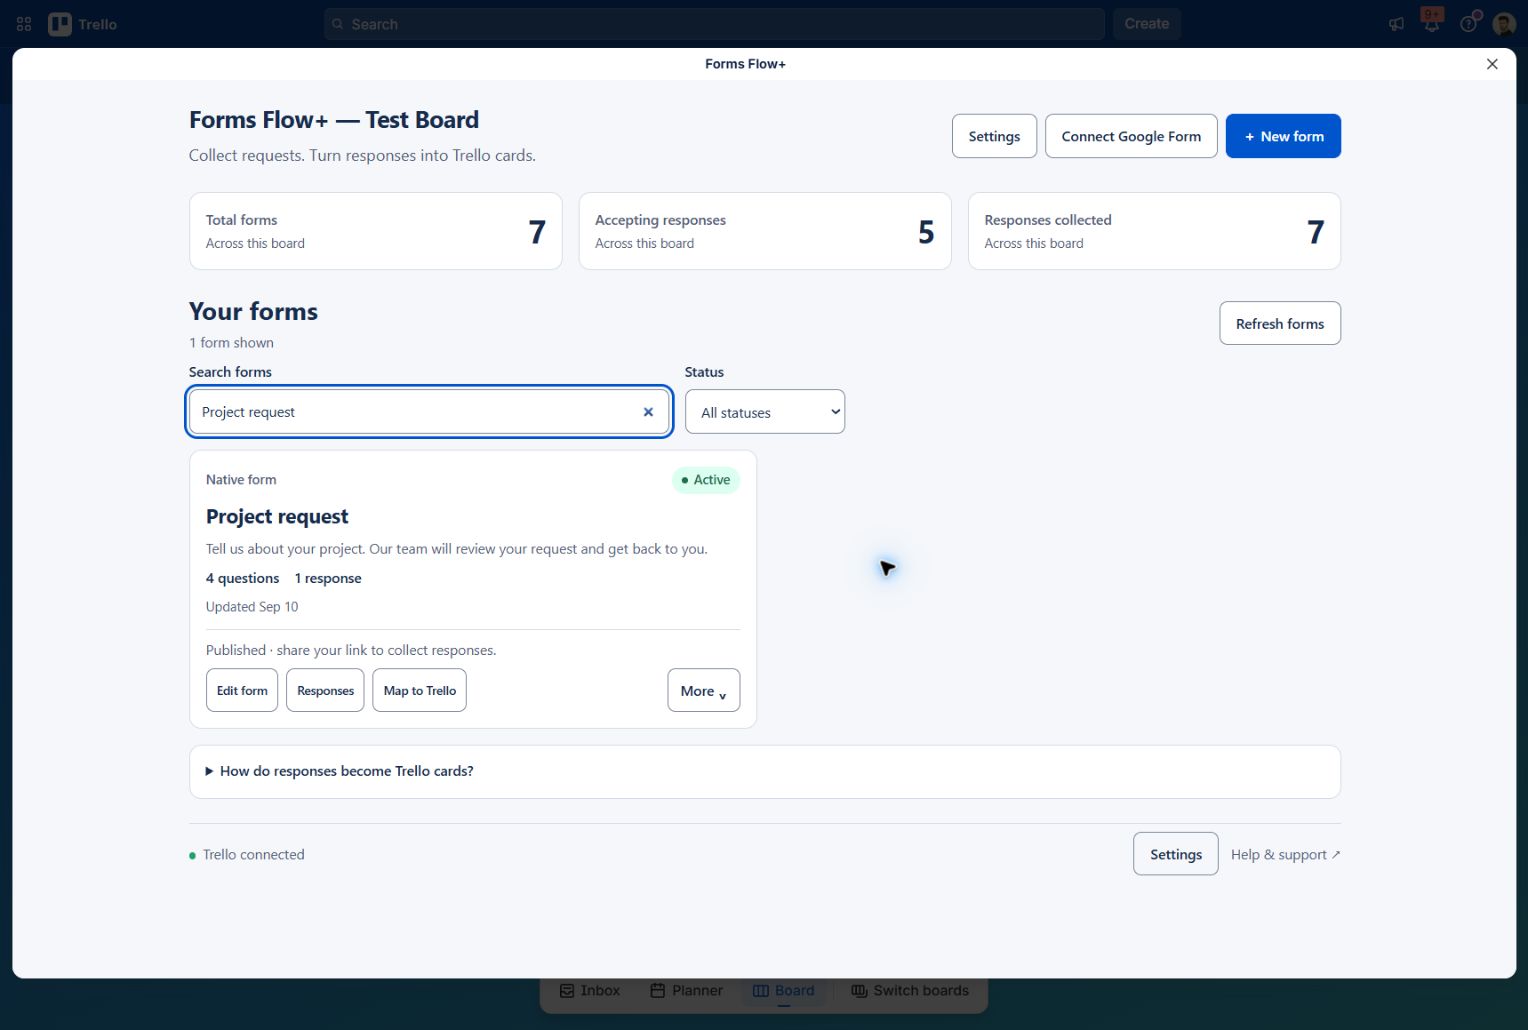
1 New form starts a blank draft. The form library is also where you return to edit, share, and review responses.
Step 02
Write questions people can understand
- Set Form name to Project request.
- Write an Introduction: “Tell us about your project. Our team will review your request and get back to you.”
- Choose a type from Add field on the left.
- Select the question card in the middle. In Field settings on the right, replace the Question label with your question.
- Add helper text if needed. For choice questions, enter one option per line.
- Check Required only when the respondent must answer that question.
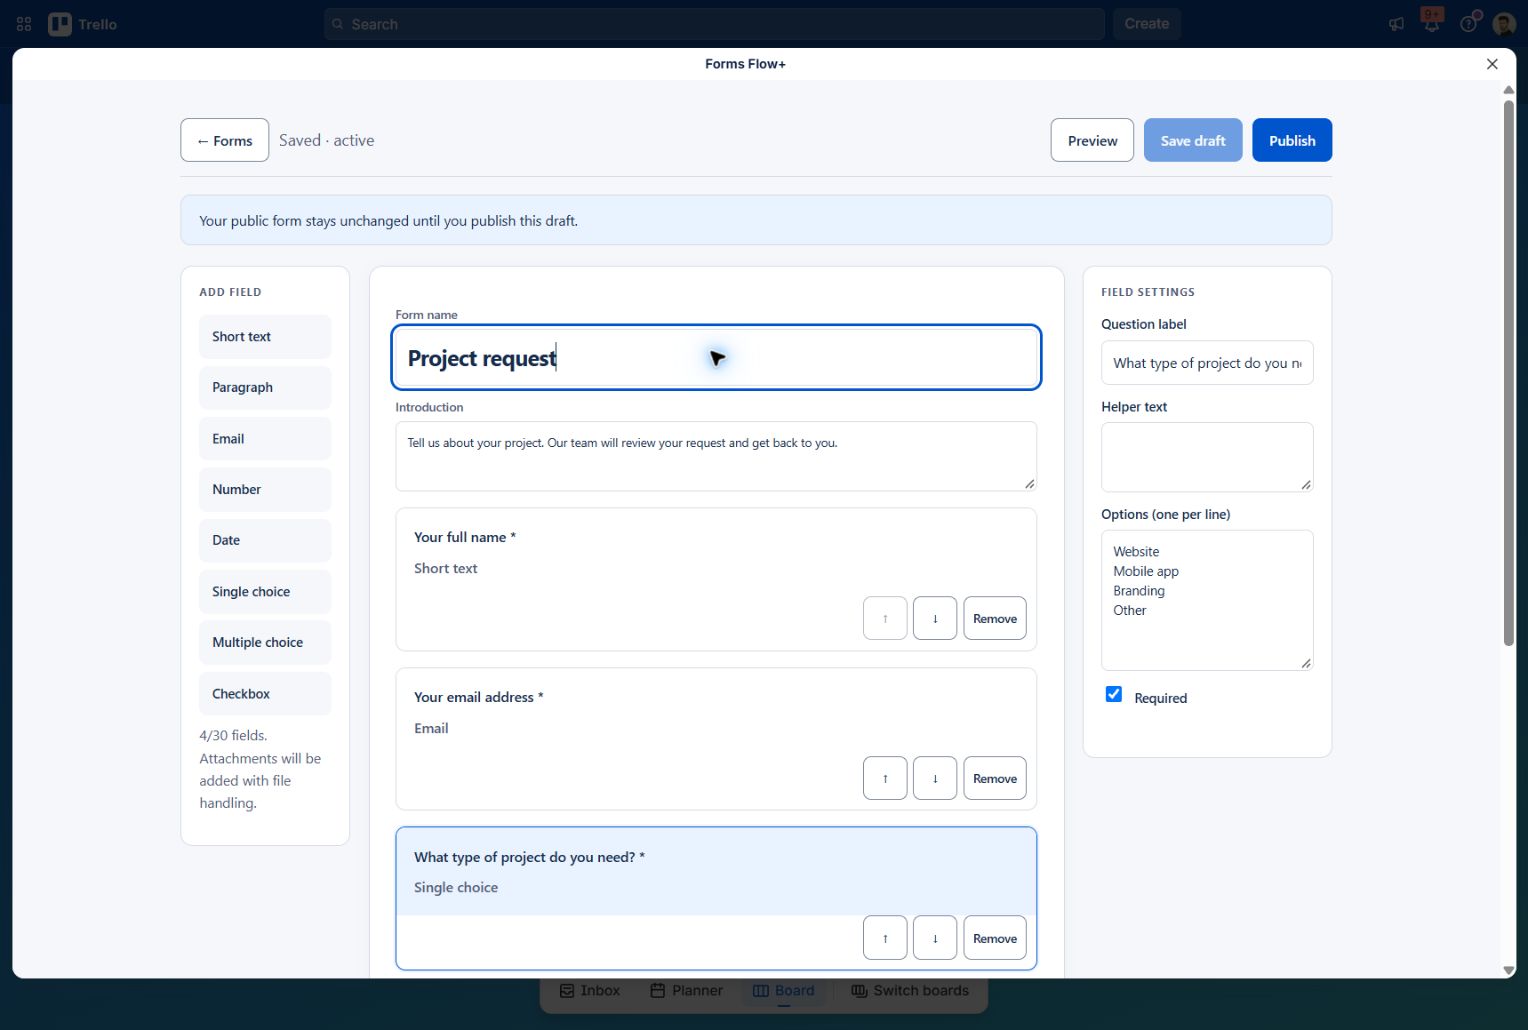
For an Email field, use “Your email address” as the Question label, not your own email address. Visitors type their email in the published form.
Which field should I choose?
| Field type | Example label | Answer format |
|---|---|---|
| Short text | Your full name | A short answer |
| Paragraph | Tell us about your project | A longer answer |
| Your email address | An email address | |
| Number | How many items? | A number |
| Date | Preferred delivery date | A date |
| Single choice | What type of project do you need? | One option |
| Multiple choice | Which services do you need? | Several options |
| Checkbox | Please contact me with updates | Checked or unchecked |
Try this four-question form
Add Your full name (Short text), Your email address (Email), What type of project do you need? (Single choice), and Tell us about your project (Paragraph).
For the Single choice question, enter these options on separate lines:
Website
Mobile app
Branding
Other
Helper text gives instructions below a question. A Placeholder is an example inside an empty input—not a saved answer. Use the up/down arrows to reorder questions.
Step 03
Save, preview, then publish
- Set the Submit button text to “Send request” and write a friendly Success message.
- Click Save draft and wait for the saved status.
- Click Preview to check how your questions look to visitors.
- Return to the editor and click Publish.
- Look for the publication confirmation and Active status.
They control whether visitors must answer a question. If Publish is disabled, save your draft and read the requirements shown on screen. See the publishing checklist.
Saving an edit does not change the live form until you publish it. If you want automatic Trello cards, set up the mapping next before sharing the link.
Step 04 · Optional
Turn new responses into Trello cards
- Return to Forms and click Map to Trello on your form.
- Enable Create a Trello card for each new response.
- Choose a Destination list on your board.
- In Card title, type “Project request —”, then click the Your full name question button to insert that answer. Do not type internal field codes yourself.
- Under Answers in description, choose the answers your team should see.
- Optionally choose labels, members, a Date question for the due date, and compatible Trello Custom Fields.
- Use Try sample answers to inspect the card preview. This does not create a card.
- Click Save mapping & connection. Complete any requested authorization for the delivery account.
- Click Publish form & mapping to apply the setup to new responses.
Project request — Alex Morgan
In your chosen Trello list, with the submitted answers in the description.
Custom Field dropdown options must match exactly. Date answers become due at 12:00 UTC. Mapping applies to new responses; don’t assume it will create cards for earlier submissions.
Step 06
Find the response—and its Trello card
- Return to Forms Flow+ and click Responses.
- Click Refresh if the new response is not visible yet.
- Expand a response to review its answers.
- If mapping is enabled, check the card delivery status.
- When delivery succeeds, click Open Trello card.
Without mapping, responses are stored here without creating cards. A received response and a delivered Trello card are separate outcomes.
Keep things organized
Edit, pause, or reuse your form
- Edit a form
- Choose Edit form, make changes, Save draft, preview, then Publish. Review mapping if you change questions used in cards.
- Pause and resume
- Choose More → Pause to stop new native submissions or Google imports. Click Resume when ready. Queued deliveries can still finish; resume uses the last published mapping.
- Find a form
- Use Search forms and the Status filter in the library.
- Reuse a structure
- Choose More → Duplicate, rename the native copy, and review its questions and mapping before publishing. Google forms offer Copy as native form.
- Archive
- Choose More → Archive when you no longer need an active form. Use the Archived filter to find forms kept for your records.
Already using Google Forms?
Connect the form you already have
- Click Connect Google Form, then Connect Google, and authorize the account that can edit your form.
- Return and choose Refresh connection.
- Choose a Google Form and click Preview import.
- Review supported questions. Choose whether to Include existing responses. Leave it unchecked to skip old responses.
- Click Add to workspace.
- Configure Map to Trello if you want cards, save, and publish.
- Submit a sample answer in Google Forms. Use More → Sync now, then refresh the response history shortly afterward.
After changing them there, choose More → Refresh Google questions in Forms Flow+. Review mapping and publish again to resume syncing.
If the app says Google sync is not configured, contact support. Native forms still work. Including existing responses can also create cards for those responses when mapping is enabled.
Make yourself at home
Settings and support
Open Settings to check connections, refresh their status, manage Google access, or change the library’s display preferences.
Compact form cards and Show dashboard summary are saved in this browser. They do not change shared forms or other members’ preferences.
For help, use Copy support details and Contact support. Include the action that failed. Never send passwords or authorization tokens.
Disconnect my account affects your Forms Flow+ connections across boards, not just the current screen. Read its confirmation carefully.
A little help when you need it
Common questions
Why can’t I publish?
Click Save draft first. Check that the form has questions and valid labels/options, and read any on-screen publishing requirements. For card creation, save a valid mapping and connect the delivery account. You also need permission to manage the form.
Marking every question Required is not necessary. If saving fails, resolve that error before trying to publish.
Where do I type a question’s name?
Click the question card in the middle of the editor, then edit Question label on the right. “Email” is a field type; “Your email address” is a useful question label.
My response arrived, but there is no card.
Open Responses and expand it. Check whether card creation is enabled, the mapping is published, and the delivery account is connected. A form can collect responses without a mapping.
For a failed delivery, fix the reported cause and use Retry delivery. For an uncertain delivery, use Check for card. Avoid repeatedly submitting the same response as a workaround.
Why doesn’t my public form show my edits?
Save draft preserves your work; Publish updates the public version. Publish the changes, then refresh the public form.
Why are my Google responses missing?
Check the Google connection and whether the form is published and not paused. Use Sync now, wait briefly, and refresh. Older responses are skipped if you did not choose Include existing responses during import.
Can I use the website demo for real submissions?
No. The demo lets you explore the builder in this browser tab, but does not save or publish. Open Forms Flow+ from a Trello board to manage real forms.
You’re ready for your first request.
Start with four simple questions. Publish, send a test, and check the result before sharing widely.
Open Trello ↗Back to the first step ↑